
Crispy Cotton Candy Cheesecake Bombs

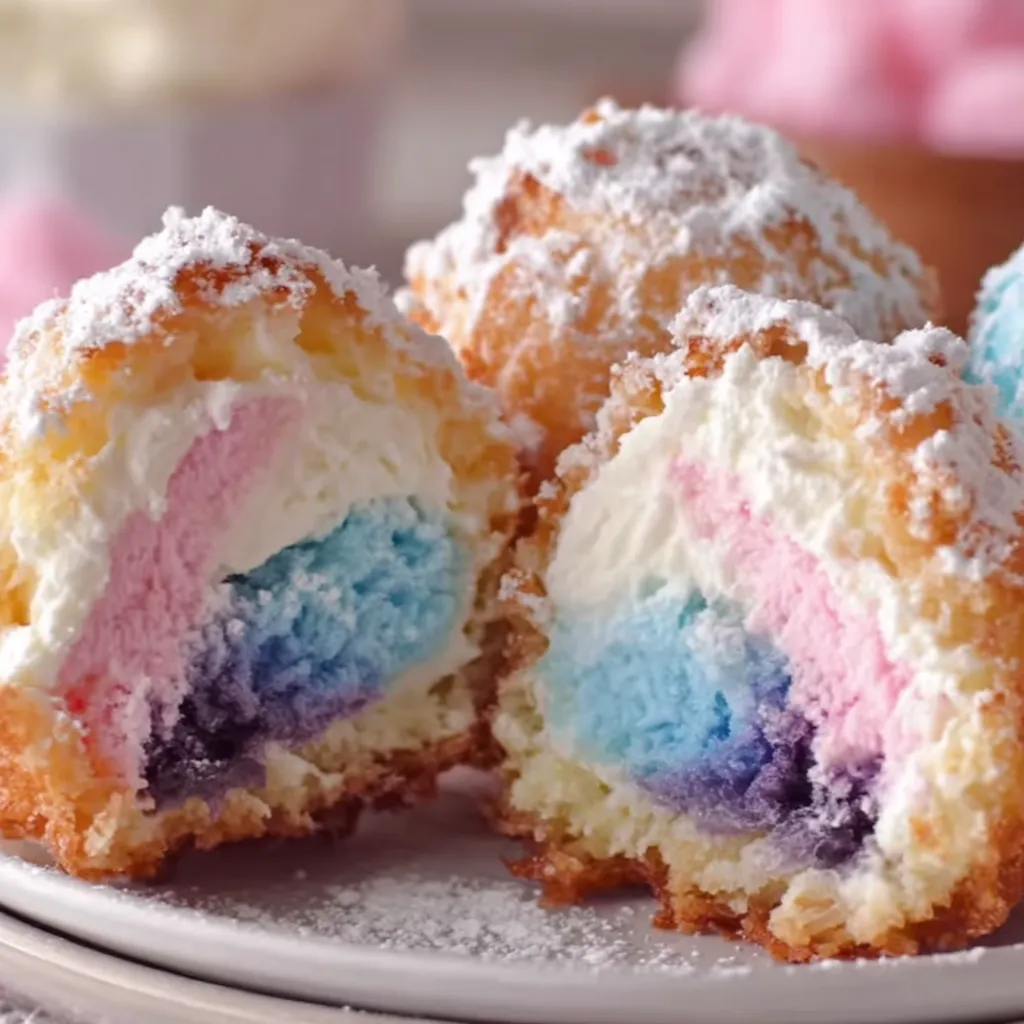
Golden, crispy exterior giving way to a creamy cotton-candy–flavored cheesecake center — a playful treat perfect for parties and weekend indulgence.
This recipe started as a playful experiment the first time I wanted to combine two beloved things: deep-fried treats and that unmistakable cotton candy nostalgia. I discovered the exact combination on a rainy afternoon when I had an unopened package of refrigerated biscuits and a craving for something whimsical and shareable. What emerged were small golden spheres with a warm, crisp shell and a silky, slightly tart cheesecake center kissed with cotton candy flavoring. They are equal parts childhood fairground memory and grown-up dessert comfort.
I make these for birthdays, small dinner parties, and weekend projects with the kids because they are quick to assemble and dramatic to serve. The contrast of textures — a thin, crunchy exterior and a cool, creamy interior — is what makes them unforgettable. The filling is delicately flavored so the sugar coating and the tuft of cotton candy on top add the showstopping sweetness and visual flair. They are best eaten warm, right after frying, when the outside is still crisp and the inside gently oozes.
Why You'll Love This Recipe
- Quick assembly using a single 8-count can of refrigerated biscuit dough and pantry staples makes this an easy last-minute dessert or party snack.
- Ready from start to finish in under an hour if you include chilling and short frying time, delivering big impact with small effort.
- The filling chills in the fridge for structure and creaminess while you prep dough, giving a reliable, not-runny center every time.
- Make-ahead friendly: you can form and freeze the filled bombs, then fry straight from frozen for convenience during gatherings.
- Visually playful: each bite-sized bomb can be finished with a tuft of cotton candy and a dusting of powdered sugar for a dramatic presentation.
- Accessible ingredients and straightforward steps make it a great family project; kids love rolling the filling and pinching the dough.
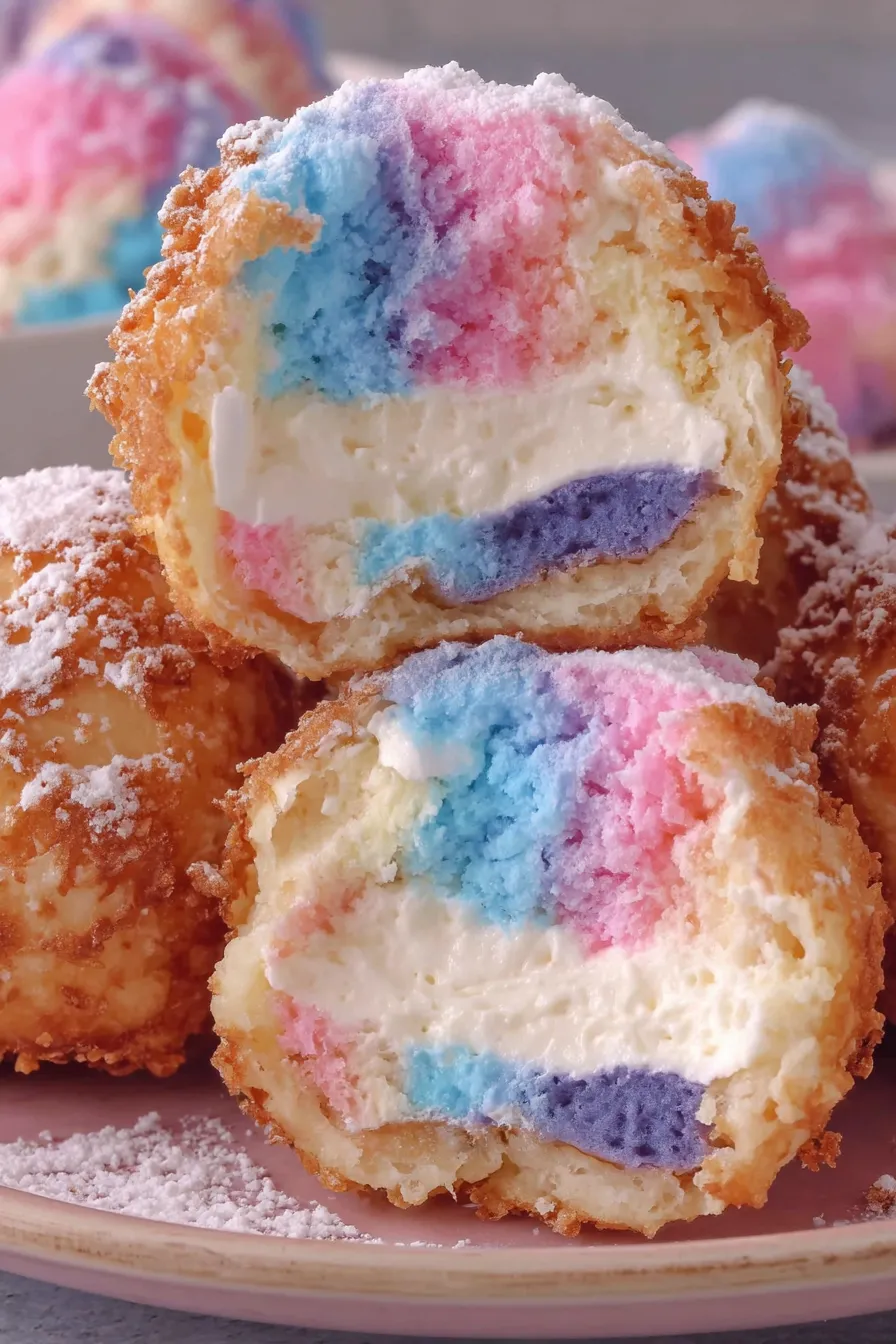
From my first test batch to now, these have become a family favorite for spontaneous celebrations. My niece insisted on helping the first time, and she still requests them for sleepovers because of the cotton candy on top. They disappear fast at parties, and the combination of contrast — warm shell, cool filling, gritty sugar coating — always gets compliments and repeat servings.
Ingredients
- Cream cheese: Use 8 ounces (1 cup) of full-fat cream cheese, softened to room temperature. Philadelphia or store-brand full-fat works best for structure and flavor; low-fat varieties can make the filling runny.
- Powdered sugar: Half a cup whisked into the cheese gives a smooth sweetness and helps the filling set. Sift if clumpy for an extra-silky texture.
- Flavorings: 1 teaspoon vanilla extract plus 1/2 teaspoon cotton candy flavoring provide the signature taste. Use a high-quality pure vanilla and a trusted cotton candy extract for a clean flavor.
- Whipped topping and heavy cream: 1/4 cup whipped topping plus 2 tablespoons heavy cream lighten the filling and make it scoopable while still creamy when chilled.
- Refrigerated biscuit dough: One 8-count package of your favorite refrigerated biscuit dough (about 8 biscuits). Pillsbury or equivalent brands are ideal for consistent size and gluten content for frying.
- Flour for dusting: 2 tablespoons all-purpose flour to prevent sticking when flattening each round. Use just enough to dust the work surface.
- For frying: 4 cups vegetable oil heated to 350 degrees Fahrenheit for deep frying in a heavy-bottomed pot.
- Coating sugars: 1 cup granulated sugar for rolling the warm bombs plus additional powdered sugar for a light finishing dusting. Keep a small tuft of cotton candy on hand for the final garnish.
Instructions
Prepare the filling: In a medium mixing bowl, beat 8 ounces softened cream cheese until smooth. Add 1/2 cup powdered sugar, 1 teaspoon vanilla, and 1/2 teaspoon cotton candy flavoring and beat until fully combined. Gently fold in 1/4 cup whipped topping and 2 tablespoons heavy cream until the mixture is silky. Chill in the refrigerator for 30 minutes to firm. Chilling is crucial so the filling keeps its shape during wrapping and frying. Flatten the dough: Lightly dust a work surface with 2 tablespoons all-purpose flour. Take each biscuit round from the package and press or roll it to about 1/8 inch thickness; thinner dough yields a crisper shell while still allowing enough strength to seal. Keep unused dough covered so it does not dry out. Assemble the bombs: Scoop 1 to 2 tablespoons of chilled filling and roll into a compact ball between your palms. Place the filling ball in the center of a flattened biscuit round. Bring the dough edges up and pinch tightly to seal, making sure there are no seams. Roll the sealed ball gently between your palms until smooth and round. Work quickly so the filling stays cool. Heat the oil: Pour 4 cups vegetable oil into a deep, heavy-bottomed pot and heat to 350 degrees Fahrenheit, using a thermometer for accuracy. Maintain steady temperature; if oil is too hot the exterior will burn before the center warms, too cool and the bombs absorb oil and become greasy. Fry in batches: Lower bombs carefully into the hot oil using a slotted spoon, frying in small batches so they do not touch. Fry each side about 1 to 2 minutes until golden brown, turning once for even color. Time will vary slightly by size; look for an even golden tone and bubbling to slow before removing. Drain and coat: Remove fried bombs and drain on paper towels for a minute to lose excess oil. While still warm, roll them in 1 cup granulated sugar until fully coated. For extra flavor, stir a few drops of cotton candy extract into the granulated sugar before rolling. Finish with a light dusting of powdered sugar and top with a tuft of cotton candy just before serving.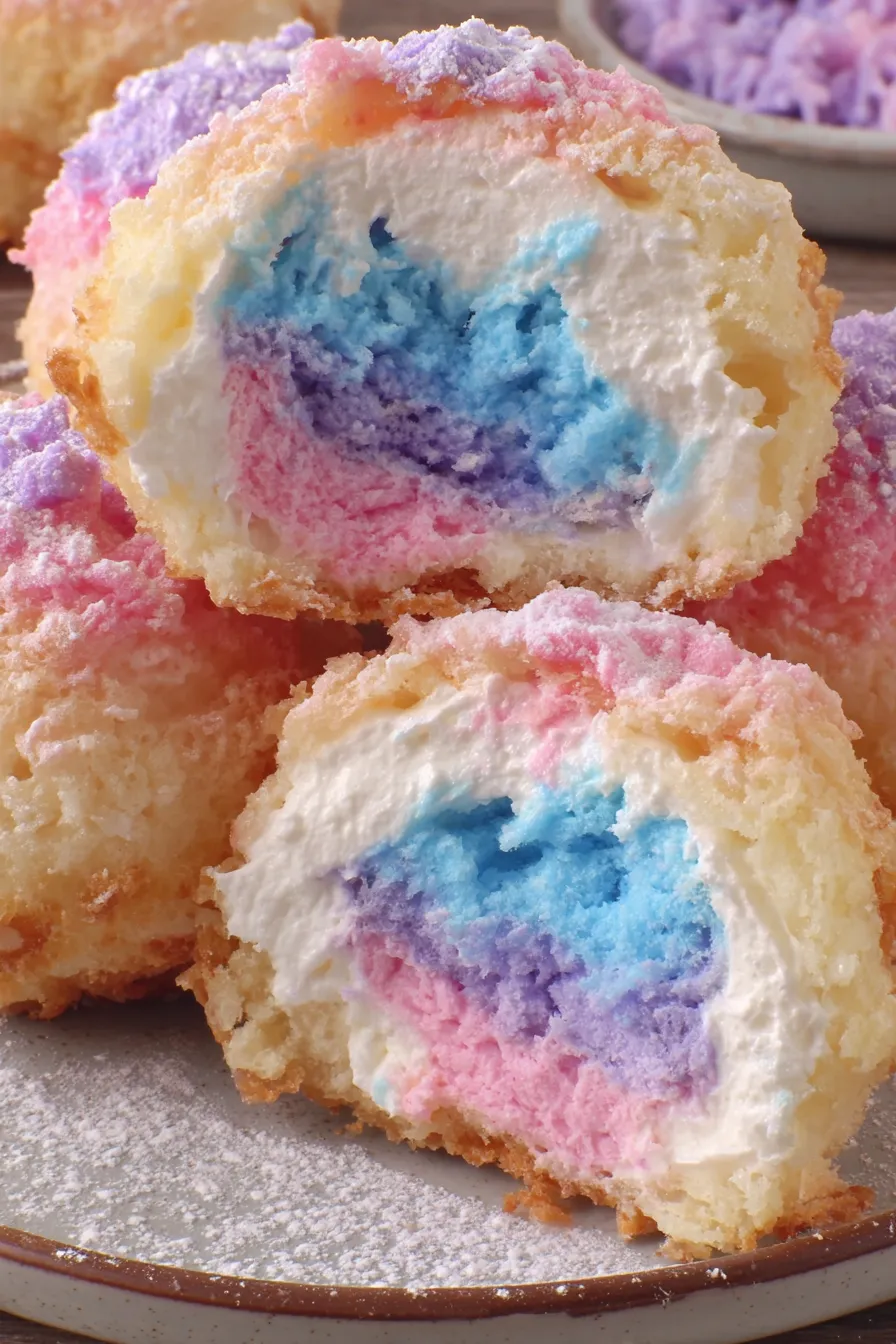
You Must Know
- Temperature control is everything: keep oil at 350 degrees Fahrenheit. A candy or deep-fry thermometer is essential for consistent results.
- Chill the filling: a firm filling prevents leakage and keeps a cool creamy center; 30 minutes in the refrigerator is the minimum.
- Don’t overcrowd the pot: frying in small batches keeps oil temperature steady and promotes even browning.
- Coating while warm: rolling the bombs in granulated sugar while still warm creates a crisp, sugary shell that contrasts with the cool filling.
My favorite part is the moment you break one open and see the creamy center contrast with the warm exterior. At family get-togethers these always spark nostalgia and conversation. One winter, I brought them to a holiday cookie swap and people were surprised it was so simple — the dramatic presentation makes it look like much more work than it actually is.
Storage Tips
These are best enjoyed hot and fresh, but you can store leftovers for short-term enjoyment. Place cooled bombs in an airtight container lined with a paper towel and refrigerate for up to 48 hours. Reheat in a 350 degrees Fahrenheit oven for 6 to 8 minutes to restore some crispness. Do not microwave; the shell will become soggy. For longer storage, freeze formed but unfried bombs on a tray until solid, then transfer to a freezer bag for up to 3 months; fry from frozen and add an extra 30 seconds per side to the frying time.
Ingredient Substitutions
Swap full-fat cream cheese for Neufchâtel in a pinch, but expect a slightly looser texture. Use whipped cream instead of whipped topping for a fresher dairy flavor; double-check stability if you plan to refrigerate longer. For gluten-free needs, use a premade gluten-free biscuit dough that handles frying; results vary by brand. To make them less sweet, reduce granulated sugar coating to 1/2 cup and omit the powdered sugar dusting, though the cotton candy garnish will still add sweetness.
Serving Suggestions
Serve these on a platter lined with parchment and offer small ramekins of berry compote, salted caramel sauce, or chocolate sauce for dipping. Garnish with sprinkles for kids’ parties or edible gold dust for grown-up events. Pair with sparkling wine or a lightly sweet rosé to balance the sugary notes, or with strong coffee for a contrast of flavors. A small tuft of cotton candy on top delivers a carnival feel and dissolves quickly when placed atop the warm surface.
Cultural Background
This treat is a playful mash-up inspired by state fair fried confections and classic American cheesecake. Deep-frying filled doughs has roots in many cultures — from Italian zeppole to southern-style fried pies — but these bombs are distinctly modern American, borrowing the cotton candy flavor that evokes fairgrounds. The use of refrigerated biscuit dough is a contemporary convenience adaptation that keeps the technique accessible to home cooks.
Seasonal Adaptations
Make them for spring and summer with pastel cotton candy and berry compote, or for fall use pumpkin spice in the sugar coating and a pinch of cinnamon in the filling. For winter holidays, fold a teaspoon of orange zest into the filling and use crushed peppermint in the granulated sugar for a festive twist. The basic method adapts easily to seasonal extracts and toppings for different occasions.
Meal Prep Tips
Form bombs the day before a party and freeze on a tray. Once solid, transfer to a sealed bag and fry on the event day. This saves active time and reduces last-minute stress. Keep the sugar coating and cotton candy separate until serving. Use labeled trays for different fillings if you make variations. For portion control, smaller 1-tablespoon filling balls yield bite-size treats perfect for buffets and grazing tables.
These crispy cotton candy cheesecake bombs are an invitation to be playful in the kitchen. Share them warm, watch people’s faces light up, and don’t be surprised when everyone asks for the secret — which, happily, is mostly simple technique and a little patience. Make them your own and enjoy the smiles.
Pro Tips
Chill the filling for at least 30 minutes so it holds shape during wrapping and frying.
Use a candy or deep-fry thermometer to maintain oil at 350 degrees Fahrenheit and avoid greasy results.
Work quickly when sealing each ball so the filling remains cold and the dough does not become sticky.
Roll in granulated sugar while the bombs are still warm for a crisp, sparkly coating.
This nourishing crispy cotton candy cheesecake bombs recipe is sure to be a staple in your kitchen. Enjoy every moist, high protein slice — it is perfect for breakfast or as a wholesome snack any time.
FAQs about Recipes
Can I make these ahead of time and freeze them?
Yes. Form the bombs and freeze on a tray until solid. Transfer to a freezer bag and fry from frozen; add about 30 seconds per side to frying time.
What oil temperature should I use?
Keep the oil at 350 degrees Fahrenheit for best results. Use a thermometer and avoid overcrowding the pot.
Tags
Crispy Cotton Candy Cheesecake Bombs
This Crispy Cotton Candy Cheesecake Bombs recipe makes perfectly juicy, tender, and flavorful steak every time! Serve with potatoes and a side salad for an unforgettable dinner in under 30 minutes.
Ingredients
Filling
Dough
Frying and Coating
Instructions
Make and chill the filling
Beat 1 cup softened cream cheese until smooth. Add 1/2 cup powdered sugar, 1 teaspoon vanilla, and 1/2 teaspoon cotton candy extract; mix until combined. Fold in 1/4 cup whipped topping and 2 tablespoons heavy cream. Chill in the refrigerator for at least 30 minutes to firm.
Flatten the biscuit dough
Dust your work surface with 2 tablespoons flour. Flatten each biscuit to about 1/8 inch thickness so it will wrap the filling without tearing.
Fill and seal
Scoop 1 to 2 tablespoons of chilled filling and roll into balls. Place in the dough center, gather edges, pinch tightly to seal, and roll between palms until smooth. Keep formed bombs chilled or covered while working.
Heat oil to 350°F
Pour 4 cups vegetable oil into a heavy pot and heat to 350 degrees Fahrenheit. Use a thermometer and maintain temperature; avoid overcrowding to keep oil steady.
Fry until golden
Lower bombs into hot oil in batches and fry 1 to 2 minutes per side until evenly golden brown. Remove with a slotted spoon and drain briefly on paper towels.
Coat and finish
While warm, roll each bomb in 1 cup granulated sugar and dust lightly with powdered sugar. Top with a small tuft of cotton candy immediately before serving.
Last Step: Please leave a rating and comment letting us know how you liked this recipe! This helps our business to thrive and continue providing free, high-quality recipes for you.
Nutrition
Did You Make This?
Leave a comment & rating below or tag
@cravele on social media!
Categories:
You might also like...

Fudgy Marshmallow Brownies
Ultra-fudgy brownies studded with chocolate chunks, crowned with gooey marshmallows and a quick cocoa icing for irresistible, crowd-pleasing decadence.

Buttery Pecan Pie Bars
Buttery shortbread crust topped with a gooey brown sugar pecan filling. Easy, crunchy, and truly irresistible with just 10 minutes of prep.

Silky No-Crack Pumpkin Cheesecake
Silky pumpkin cheesecake with a spiced graham crust, no cracks, effortless mixing, and decadent caramel and rum whipped cream for unforgettable holiday celebrations.
Did You Make This?
Leave a comment & rating below or tag @cravele on social media!
Rate This Recipe
Share This Recipe
Enjoyed this recipe? Share it with friends and family, and don't forget to leave a review!
Comments (1)
This recipe looks amazing! Can't wait to try it.
Comments are stored locally in your browser. Server comments are displayed alongside your local comments.

Hi, I'm Emily!
What's Popular

30-Minute Meals!
Join to receive our email series which contains a round-up of some of our quick and easy family favorite recipes.