
Classic Homemade Hard Candy

Bright, glassy hard candies flavored with anise, lemon, or orange—simple ingredients, timeless technique, and a perfect homemade treat.
This homemade hard candy recipe has been my kitchen’s little laboratory of nostalgia. I first tried this exact technique one winter afternoon when I wanted a small, do-able candy project that didn’t require tempering chocolate or complicated equipment. The result was pure, glassy pieces with brittle snap and a concentrated flavor that carried me straight back to the candies my grandmother used to tuck into holiday tins. It’s the kind of recipe that rewards attention—watch the thermometer, move quickly, and you’ll get jewel-like candies that are both festive and utterly satisfying.
What makes this preparation special is its simplicity and control: three pantry ingredients for the base and a handful of finishing choices let you customize color and flavor without fuss. The texture is brittle and clear when done right; the surface can be glossy or frosted depending on how much confectioners’ sugar you use when finishing. I remember handing a plate of freshly cut pieces to my skeptical teenager; she polished off half the batch before dinner and asked when I’d make more. This method also scales comfortably and is an excellent weekend project when you want something handmade to gift.
Why You'll Love This Recipe
- Simple ingredient list—uses common pantry staples: granulated sugar, light corn syrup, and water, so you can start without a special shop trip.
- Quick turnaround: active time is short (about 30–40 minutes) and you’ll have candies set and ready within an hour.
- Customizable flavors—choose anise for a classic bite, lemon for brightness, or orange for a warm citrus note; food coloring lets you create attractive batches.
- Great for gifting and entertaining—cut into bite-sized pieces and package in cellophane or small tins for a homemade present.
- Make-ahead friendly: once fully cooled they store well in an airtight container for weeks if kept dry.
- Low-tech project—no candy mold needed; a sugar-lined jelly-roll pan serves as a simple, effective mold and finishing surface.
In my experience this technique is forgiving if you follow the temperature rule and finish with confectioners’ sugar to prevent sticking. Family and friends always appreciate the bright colors and bold flavors; at potlucks these often disappear first because they look like little glass gems.
Ingredients
- Granulated sugar (2 cups): Use a high-quality white granulated sugar—brands like Domino or C&H work perfectly. Even, fine crystals dissolve consistently, which helps you reach a clear finish without graininess.
- Light corn syrup (3/4 cup): Karo or store-brand light corn syrup keeps the crystallization at bay and yields a smooth, glassy texture. Do not substitute honey or maple syrup; they change the flavor and set point.
- Water (1/2 cup): Helps hydrate the sugar and give you control while heating. Filtered water is fine but not necessary—tap water works in most regions.
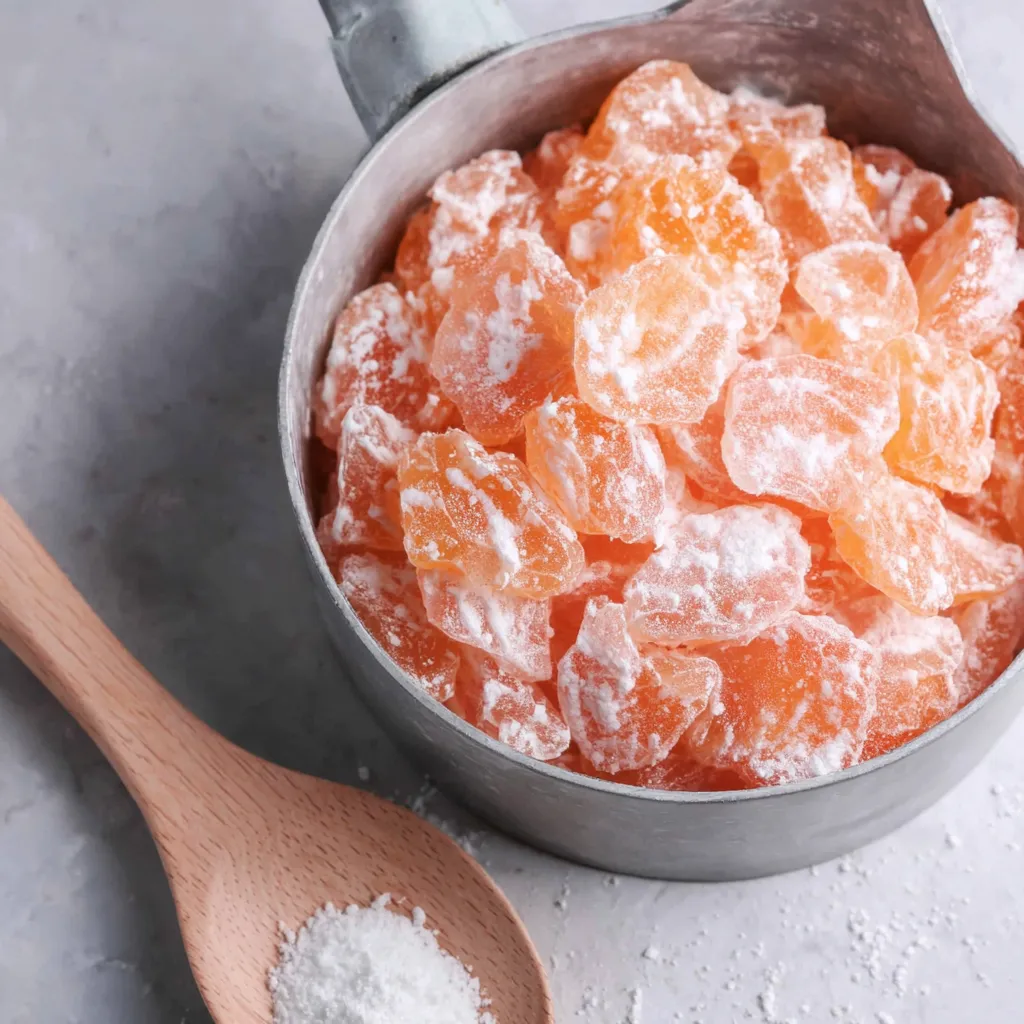
- Confectioners’ sugar (5–6 cups): This creates the sanding bed and final dusting to keep pieces from sticking; it also softens sharp edges slightly. Use fresh powdered sugar that is not clumpy.
- Extract (1–2 teaspoons): Choose anise, lemon, or orange extract. Pure extracts give the most intense, clean flavor; artificial extracts are fine if that’s what you have on hand—adjust quantity to taste.
- Liquid food coloring (optional): Red, yellow, or orange will tint your candies without affecting setting. Use gel sparingly if you prefer, but dilute gel in the extract first to avoid altering the syrup balance.
Instructions
Prepare the Pan: Fill a 15 x 10 x 1-inch jelly-roll pan with 5 to 6 cups of confectioners’ sugar to a depth of about 1/2 inch. Use the handle end of a wooden spoon to press a continuous, slightly curved groove through the sugar; this small channel acts as a simple mold and makes it easier to slice uniform pieces later. Set aside near your stove so you can work quickly once the syrup is ready. Combine Candy Ingredients: In a large, heavy-bottomed saucepan combine 2 cups granulated sugar, 3/4 cup light corn syrup, and 1/2 cup water. Place over medium heat and stir only until the sugar dissolves; once the mixture heats, stop stirring to avoid splashing. Use a wet pastry brush to wash down any sugar crystals on the pan sides to reduce the risk of uncontrolled crystallization. Dissolve Sugar Crystals: When the mixture comes to a full boil, cover the saucepan and let it cook for 3 minutes without stirring—this traps steam and helps dissolve undissolved crystals. After 3 minutes remove the lid and continue to cook. Covering briefly is a classic technique to promote a clear, smooth syrup. Cook to Hard-Crack Stage: Uncover and raise the heat to medium-high. Using a reliable candy thermometer clipped to the side, cook the syrup without stirring until it reaches 300°F—this is the hard-crack stage. The syrup will be amber and very fluid; remove from heat immediately when it hits temperature to prevent burning. Add Flavor and Color: Off the heat, stir in 1 to 2 teaspoons of your chosen extract and a few drops of liquid food coloring if desired. Add the extract carefully—stirring vigorously at this stage can create air bubbles, so mix gently to incorporate evenly. Pour Candy into Mold: Pour the hot syrup into a heatproof glass measuring cup for easier handling, then working quickly pour the syrup into the prepared sugar groove in the pan. Move deliberately but don’t dawdle; once poured the syrup begins to set within minutes. Coat and Cool: Generously dust the top of the poured syrup with more confectioners’ sugar to prevent sticking. Allow the candy to cool completely at room temperature until firm—this typically takes 30–60 minutes depending on ambient temperature and the thickness of the pour. Cut and Store: When firm, use sharp scissors to cut along the sugar groove into bite-sized pieces. Toss pieces in a little confectioners’ sugar to coat any exposed sticky spots, then shake off excess. Store in a dry, covered container at room temperature; avoid humid environments which can soften the candy.
You Must Know
- Hard candies are nearly 100% sugar—each piece provides quick energy and should be enjoyed in moderation; keep portions small.
- This preparation freezes poorly; do not refrigerate (cold and moisture will cause sticky bloom). Store at room temperature in a dry container.
- Maintain a clean pan and avoid stirring once boiling; stirring encourages crystallization which ruins clarity and texture.
- The key visual cue for readiness is the thermometer hitting 300°F and a thin, amber, very fluid syrup—do not guess by color alone if you can use a thermometer.
My favorite part is the satisfying, glassy snap and the way the flavors concentrate—lemon pieces cut right through sugar sweetness with a bright finish. I’ve given these out at neighborhood gatherings and watched them become an instant hit: people always comment on how much like vintage candy they taste.

Storage Tips
Store finished pieces in an airtight container layered with parchment or wax paper to avoid sticking. Keep the container in a cool, dry place away from sunlight—humidity is the enemy and will cause candies to become tacky. Properly stored, they remain enjoyable for 2–4 weeks; beyond that they may lose shine and develop a softer texture. Do not refrigerate or freeze: cold storage introduces condensation during temperature changes which ruins the crisp snap.
Ingredient Substitutions
If you don’t have light corn syrup, you can use glucose syrup (1:1 substitution) which preserves texture similarly; avoid honey or molasses because they alter flavor and setting temperature. For extracts, you can use essential oils designed for candy in very small quantities—start with 1/4 teaspoon and adjust, as oils are concentrated. Gel colors are fine but blend them into the extract first to prevent thickened spots in the syrup.
Serving Suggestions
Serve these as small palate cleansers after a heavy meal, or package them in cello bags tied with ribbon for parties. They’re excellent when displayed in clear jars—group colors by hue for a vibrant, decorative candy board. Garnish gift tins with a strip of washi tape and a small label indicating the flavor. For gatherings, arrange mixed flavors on a small plate so guests can sample different notes.
Cultural Background
Hard candy has a long history in Western confectionery, with simple sugar syrups crafted into clear candies for centuries. Traditional European and American recipes evolved as cooks learned to control temperature and crystallization, producing the familiar hard, glass-like sweets. These small, flavored pieces bring to mind old-fashioned candy shops and home kitchens where candy-making was an occasional but treasured activity.
Seasonal Adaptations
For winter holidays, use peppermint or anise extract and tint pieces red and white for a festive look. In summer, bright citrus extracts and yellow/orange hues make lively treats for barbecues. For Halloween, dye batches deep orange and red and package with themed wrappers. Adjust flavor intensity slightly higher for larger pieces so the taste remains noticeable after the sugar coating.
Meal Prep Tips
Make this in small batches and keep extra confectioners’ sugar on hand to recoat any sticky pieces later. Prepare your pan and tools before heating the syrup because timing is crucial—the syrup must be poured while still fluid. If you plan to gift them, make them the day before distribution to allow full drying time and check for any tackiness before packaging.
Making these at home is a wonderful mix of precision and creativity: follow the temperature guidelines, work safely, and enjoy the process of turning humble pantry items into tiny luminous treats. Share them, gift them, and most of all, savor the simple pleasure of candy made by hand.
Pro Tips
Use a reliable candy thermometer clipped to the saucepan to ensure you reach exactly 300°F for hard-crack texture.
Work with a prepped sugar-lined pan close to the stove so you can pour the syrup quickly and accurately.
Avoid stirring the syrup once it boils; cover briefly to dissolve crystals, then uncover to finish cooking.
This nourishing classic homemade hard candy recipe is sure to be a staple in your kitchen. Enjoy every moist, high protein slice — it is perfect for breakfast or as a wholesome snack any time.
Tags
Classic Homemade Hard Candy
This Classic Homemade Hard Candy recipe makes perfectly juicy, tender, and flavorful steak every time! Serve with potatoes and a side salad for an unforgettable dinner in under 30 minutes.
Ingredients
Candy Base
Preparation and Finishing
Instructions
Prepare the Pan
Fill a 15 x 10 x 1-inch pan with 5 to 6 cups confectioners’ sugar to a depth of 1/2 inch; use a wooden spoon handle to create a continuous curved indentation to serve as the mold.
Combine Candy Ingredients
In a large heavy saucepan combine 2 cups granulated sugar, 3/4 cup light corn syrup, and 1/2 cup water; place over medium heat and stir until sugar dissolves, then stop stirring.
Dissolve Sugar Crystals
When the mixture reaches a boil, cover and cook for 3 minutes without stirring to dissolve any undissolved sugar crystals; then remove the lid and continue cooking.
Cook to Hard-Crack Stage
Uncover and increase heat to medium-high; cook without stirring until the candy thermometer registers 300°F (hard-crack stage), then remove from heat immediately.
Add Flavor and Color
Off the heat, stir in 1 to 2 teaspoons extract of choice and add a few drops of liquid food coloring if desired; mix gently to avoid air bubbles.
Pour Candy into Mold
Pour the hot syrup into a heatproof glass measuring cup, then quickly pour it into the prepared groove in the confectioners’ sugar-lined pan.
Coat and Cool
Dust the poured candy with more confectioners’ sugar on top to prevent sticking; let cool completely at room temperature until firm, about 30–60 minutes.
Cut and Store
Use scissors to cut into bite-sized pieces along the groove; toss lightly in confectioners’ sugar and store in a dry, airtight container at room temperature.
Last Step: Please leave a rating and comment letting us know how you liked this recipe! This helps our business to thrive and continue providing free, high-quality recipes for you.
Nutrition
Did You Make This?
Leave a comment & rating below or tag
@cravele on social media!
Categories:
You might also like...

Fudgy Marshmallow Brownies
Ultra-fudgy brownies studded with chocolate chunks, crowned with gooey marshmallows and a quick cocoa icing for irresistible, crowd-pleasing decadence.

Buttery Pecan Pie Bars
Buttery shortbread crust topped with a gooey brown sugar pecan filling. Easy, crunchy, and truly irresistible with just 10 minutes of prep.

Silky No-Crack Pumpkin Cheesecake
Silky pumpkin cheesecake with a spiced graham crust, no cracks, effortless mixing, and decadent caramel and rum whipped cream for unforgettable holiday celebrations.
Did You Make This?
Leave a comment & rating below or tag @cravele on social media!
Rate This Recipe
Share This Recipe
Enjoyed this recipe? Share it with friends and family, and don't forget to leave a review!
Comments (1)
This recipe looks amazing! Can't wait to try it.
Comments are stored locally in your browser. Server comments are displayed alongside your local comments.

Hi, I'm Emily!
What's Popular

30-Minute Meals!
Join to receive our email series which contains a round-up of some of our quick and easy family favorite recipes.