
Christmas Truffles

Creamy peanut butter truffles coated in white chocolate and decorated with festive sprinkles — a no-bake holiday treat everyone will love.
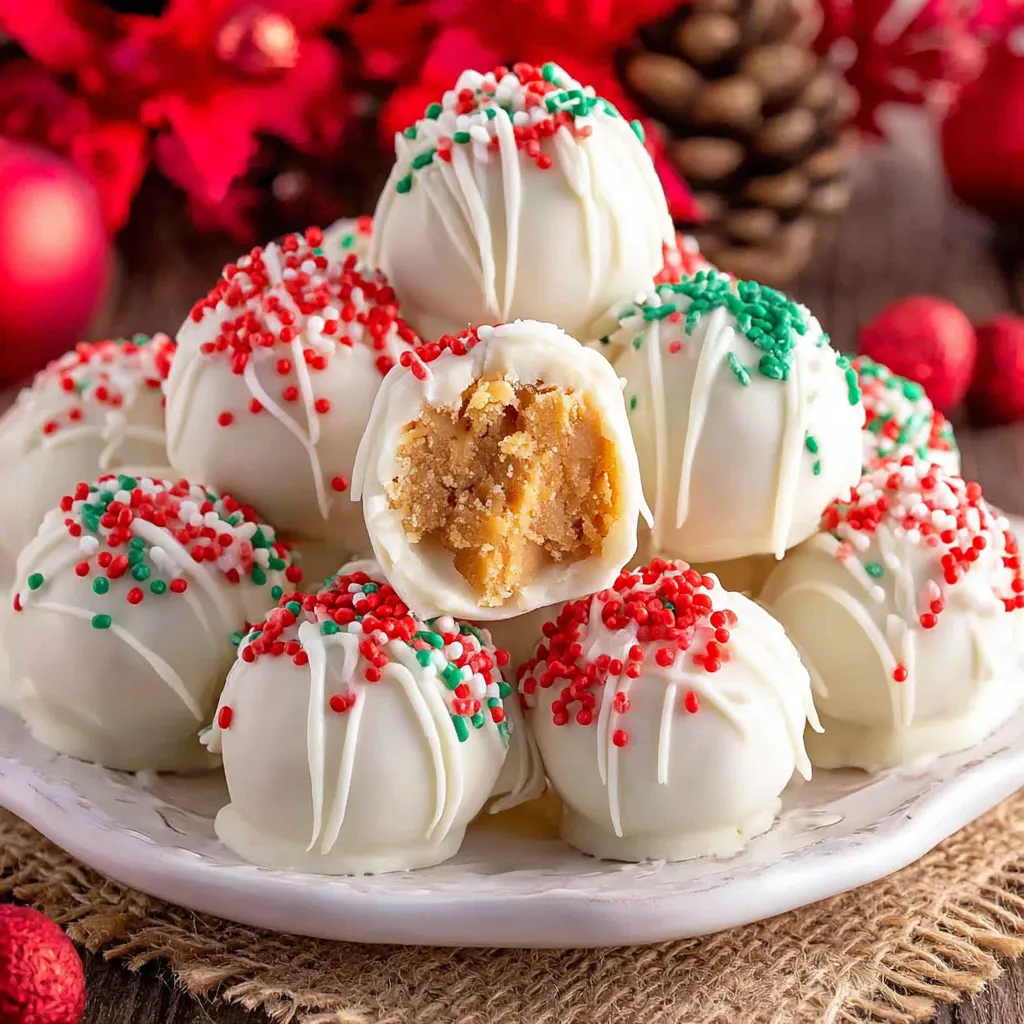
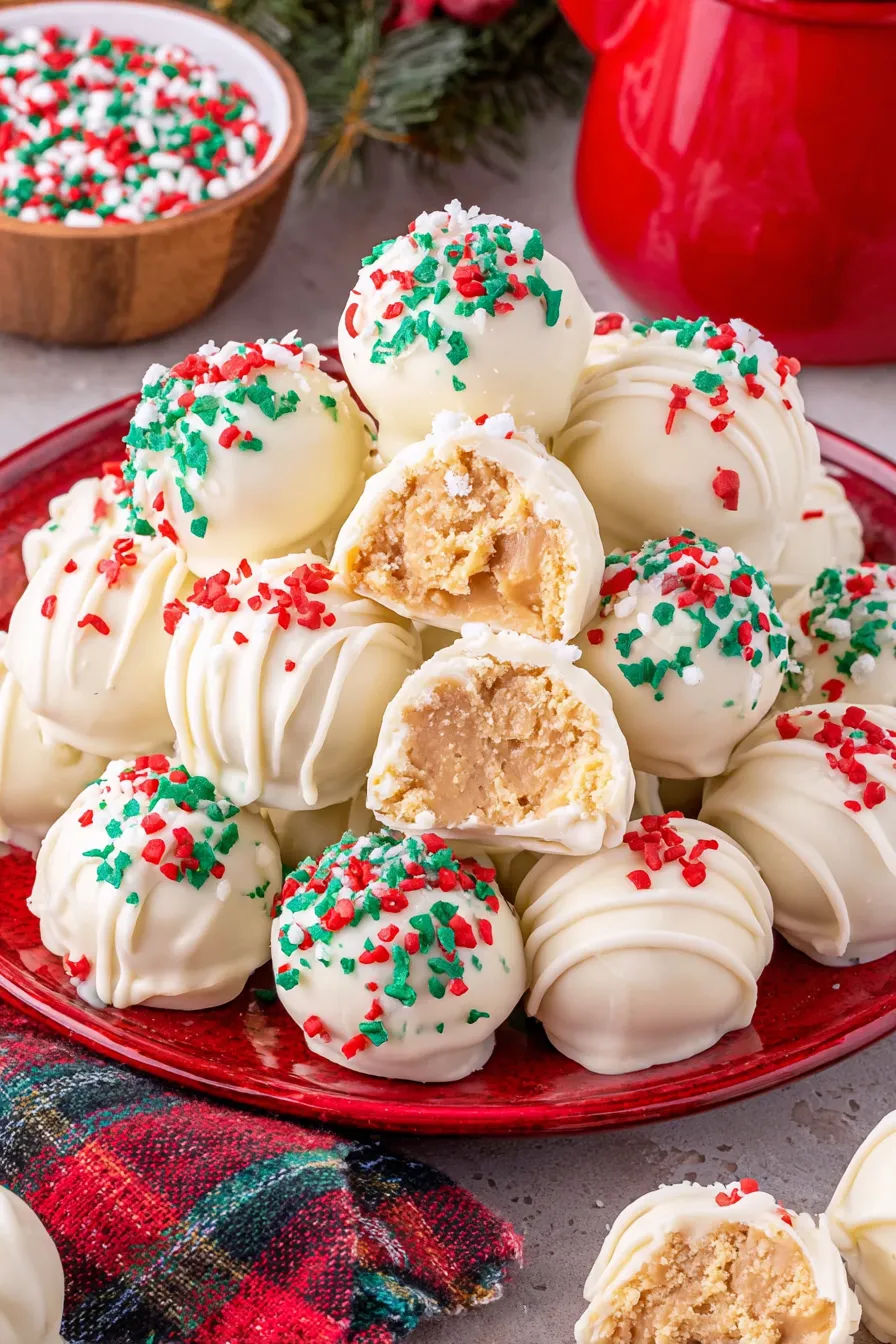
This little batch of Christmas truffles has been my go-to holiday treat ever since I first made them for a neighbor exchange years ago. I discovered the simple combination of powdered sugar and peanut butter one hectic December evening when I wanted something truly festive but fast. The result was so silky, sweet, and nostalgic that friends asked for the recipe right away. These bites are buttery, melt-in-your-mouth centers cloaked in crisp white chocolate, and the sprinkles add that joyful crunch and color wave that screams holiday cheer.
I love how approachable this recipe is: no baking, no fancy tempering skills, and ingredients you can keep in the pantry year-round. The texture contrast is what keeps me coming back — the dense, sugary peanut-butter center against a thin, crisp shell of white melting chocolate. I often make a double batch and hide a few for myself because the combination of creamy peanut butter and sweet white chocolate triggers such a cozy, celebratory nostalgia. These truffles are perfect for plate-to-plate gifting, last-minute parties, or curling up with a cup of tea while the tree lights twinkle.
Why You'll Love This Recipe
- Ready in about 30 minutes from start to finish when you include chilling—great for last-minute host duties or quick homemade gifts.
- Uses simple pantry staples: powdered sugar, peanut butter, butter, and melting chocolate—no specialty ingredients required.
- No oven required, so it’s perfect for apartment dwellers or when the household oven is busy with other holiday dishes.
- Totally customizable: swap sprinkles, drizzle dark chocolate, or roll in crushed candy canes to tailor flavors and textures.
- Make-ahead friendly: centers can be formed and refrigerated or frozen, then dipped when you’re ready to finish and decorate.
From my experience, these little treats consistently score highest at cookie swaps and family gatherings. My niece calls them "snowball candies" and demands a handful every time she visits. They’re the sort of recipe that invites improvisation — swap the peanut butter variety, switch the toppings, and you’ll still end up with something warmly addictive.
Ingredients
- Powdered sugar (1 cup): This provides structure and the classic melt-in-your-mouth sweetness. Use a fine confectioners' sugar for best texture; I prefer Domino or C&H for consistent results.
- Peanut butter (1/2 cup): Creamy gives a smoother center, chunky adds crunch. Choose a natural jar for a nuttier flavor or a conventional jar for sweeter notes; Jif or Skippy work well.
- Butter (3 tablespoons, room temperature): Adds richness and helps bind the center. Unsalted is preferred so you can control sodium; if your peanut butter is unsweetened, add a pinch more salt to taste.
- White melting chocolate (16 ounces): Use wafers or melting bark for an easy, glossy shell. Ghirardelli or Merckens melting wafers produce a reliable snap. If using white chocolate chips, add a tablespoon of vegetable shortening for shine.
- Christmas sprinkles and other toppings: Candy canes (crushed), festive nonpareils, edible glitter, or chopped toasted almonds. Choose toppings that contrast in color and texture for a festive finish.
Instructions
Combine the base: In a medium mixing bowl, add 1 cup powdered sugar, 1/2 cup peanut butter, and 3 tablespoons softened butter. Use a large spatula or wooden spoon to stir until a cohesive, slightly tacky dough forms. You’re aiming for a pliable mass that holds its shape—if it’s too crumbly, add a teaspoon of peanut butter; if too sticky, dust lightly with more powdered sugar. Shape the centers: Using a small portion scoop or a tablespoon, portion the mixture into even scoops. Roll each scoop between your palms to form smooth balls roughly 1 inch in diameter. Place them on a parchment-lined tray with space between each. Chilling is important: refrigerate for 15–30 minutes so the centers firm up and are easier to dip. Melt the coating: Place 16 ounces white melting chocolate in a microwave-safe bowl. Microwave in 30-second bursts at medium power, stirring between intervals until fully melted and smooth. Avoid overheating—white chocolate burns quickly; stop when mostly melted and stir to finish melting with residual heat. Dip and decorate: Using a fork or dipping tool, submerge each chilled ball into the melted chocolate, tapping the fork to drain excess coating. Return coated truffles to parchment paper and immediately sprinkle with your chosen toppings so they adhere before the shell sets. Work in small batches to keep the chocolate fluid. Set and store: Let the coated truffles sit at room temperature until the chocolate firms, about 10–20 minutes, or place them briefly in the refrigerator for faster setting. Store in an airtight container layered with parchment at cool room temperature for a few days or refrigerate for up to 2 weeks.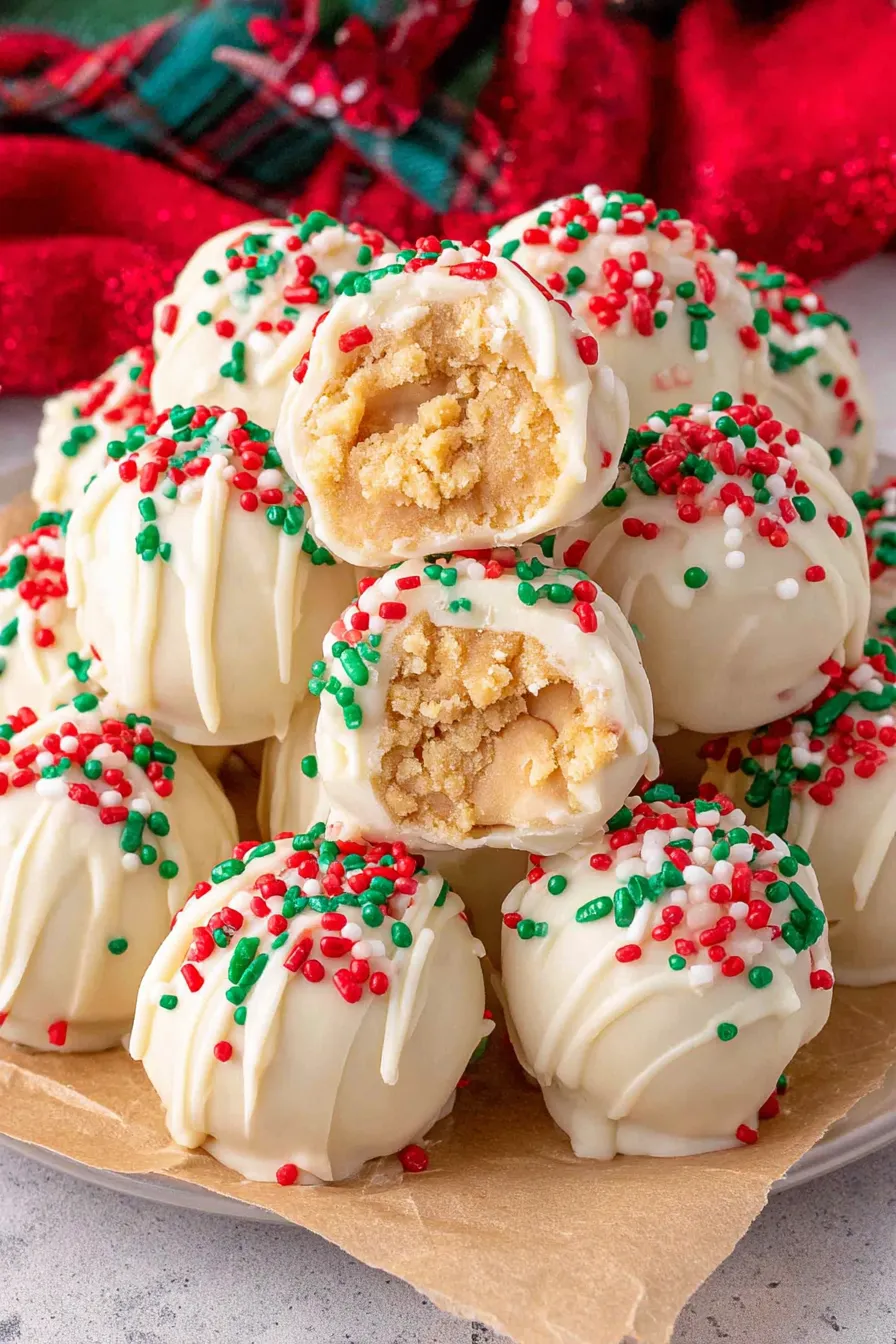
You Must Know
- These truffles are high in calories and fat — about 110–140 kcal per piece depending on size and toppings; treat them as an indulgent holiday confection.
- They freeze exceptionally well: freeze on a tray until solid, then transfer to an airtight container for up to 3 months.
- Toppings matter: some sprinkles contain wheat or gluten, so check labels if you need a gluten-free option.
- White chocolate can bloom (turn gray) if overheated; melt gently and avoid steam contact during cooling.
My favorite thing about these is how versatile they are: once you master a smooth center and a thin shell, you can create countless variations. Family and friends have told me these are the best they’ve tasted because the center is sweet without being cloying and the shell provides a satisfying snap.
Storage Tips
Store truffles in a single layer or separated by parchment to prevent sticking. At room temperature in a cool, dry spot they will keep for 3–5 days; refrigeration will extend shelf life to about 2 weeks but can cause the shell to sweat when returned to room temperature. For longer storage, freeze on a tray until solid, then pack in airtight, freezer-safe containers with parchment layers for up to 3 months. Thaw overnight in the refrigerator to avoid condensation on the chocolate surface.
Ingredient Substitutions
If you need a nut-free version, swap peanut butter for sunflower seed butter in a 1:1 ratio for a similar texture and richness. For a dairy-free shell, use vegan white candy coating and dairy-free butter alternatives; coconut butter will change the flavor profile but still yield a solid center. If you want a slightly less sweet center, replace 2 tablespoons of powdered sugar with 1 tablespoon of unsweetened cocoa powder and add a touch more peanut butter to maintain cohesion.
Serving Suggestions
Arrange these on a festive platter with a mix of colored sprinkles and crushed candy canes for contrast. Serve alongside coffee, spiced tea, or mulled wine; the sweet-and-salty profile pairs well with bitter or spiced beverages. For gifting, place 8–12 pieces in parchment-lined boxes tied with ribbon. Garnish with a small edible glitter dust or a drizzle of dark chocolate to create a sophisticated two-tone look.
Cultural Background
Sweet nut confections have long been part of winter celebrations across many cultures; these truffles are an American-style no-bake adaptation that blends peanut butter candy traditions with European chocolate-dipped treats. The idea of coating a sweet center with chocolate goes back centuries, but the simplicity of powdered sugar and nut butter centers became popular in mid-20th-century home cookery as convenience ingredients proliferated.
Seasonal Adaptations
For a winter twist, add 1/2 teaspoon ground cinnamon and a pinch of nutmeg to the center mixture. In spring, replace sprinkles with toasted coconut flakes and lemon zest mixed into the shell for a brighter flavor. For Valentine’s Day swap the sprinkles for freeze-dried raspberry powder and a dark chocolate coating to offset the sweetness of white chocolate.
Meal Prep Tips
Make the centers up to 3 days ahead and keep them chilled, then melt coating and dip on the day you plan to serve for the freshest shell. If you’re prepping for a large party, portion the centers onto multiple trays and flash-freeze before storing in containers so they won’t stick together. Label containers with dates and topping choices to keep track of variations.
These truffles are a small, joyful labor that reward you with color, crunch, and creamy nostalgia. They’re forgiving, family-friendly, and endlessly adaptable — try them once and I bet they’ll become a holiday go-to in your household too.
Pro Tips
Chill centers before dipping to prevent the shell from cracking and to make dipping easier.
Melt white chocolate in short bursts and stir between intervals to avoid scorching.
Work in small batches to keep coating temperature consistent and toppings fresh.
If chocolate thickens, gently reheat in 10-second bursts and stir to restore fluidity.
This nourishing christmas truffles recipe is sure to be a staple in your kitchen. Enjoy every moist, high protein slice — it is perfect for breakfast or as a wholesome snack any time.
Tags
Christmas Truffles
This Christmas Truffles recipe makes perfectly juicy, tender, and flavorful steak every time! Serve with potatoes and a side salad for an unforgettable dinner in under 30 minutes.
Ingredients
Main
Toppings
Instructions
Combine base ingredients
In a medium bowl combine 1 cup powdered sugar, 1/2 cup peanut butter, and 3 tablespoons softened butter. Stir with a spatula until a cohesive dough forms, adding a touch more powdered sugar if too sticky.
Form centers
Scoop the mixture with a small portion scoop or tablespoon and roll into 1-inch balls. Place on parchment and refrigerate for 15–30 minutes to firm.
Melt coating
Melt 16 ounces white melting chocolate in a microwave-safe bowl in 30-second bursts, stirring between each until smooth and glossy. Avoid overheating to prevent graininess.
Dip and decorate
Dip chilled centers into melted chocolate, tap to drain excess, then place on parchment and immediately add sprinkles or toppings so they adhere before the shell sets.
Set and store
Allow shells to firm at room temperature for 10–20 minutes or refrigerate briefly. Store in an airtight container layered with parchment for up to 2 weeks refrigerated or freeze for up to 3 months.
Last Step: Please leave a rating and comment letting us know how you liked this recipe! This helps our business to thrive and continue providing free, high-quality recipes for you.
Nutrition
Did You Make This?
Leave a comment & rating below or tag
@cravele on social media!
Categories:
You might also like...

Fudgy Marshmallow Brownies
Ultra-fudgy brownies studded with chocolate chunks, crowned with gooey marshmallows and a quick cocoa icing for irresistible, crowd-pleasing decadence.

Buttery Pecan Pie Bars
Buttery shortbread crust topped with a gooey brown sugar pecan filling. Easy, crunchy, and truly irresistible with just 10 minutes of prep.

Silky No-Crack Pumpkin Cheesecake
Silky pumpkin cheesecake with a spiced graham crust, no cracks, effortless mixing, and decadent caramel and rum whipped cream for unforgettable holiday celebrations.
Did You Make This?
Leave a comment & rating below or tag @cravele on social media!
Rate This Recipe
Share This Recipe
Enjoyed this recipe? Share it with friends and family, and don't forget to leave a review!
Comments (1)
This recipe looks amazing! Can't wait to try it.
Comments are stored locally in your browser. Server comments are displayed alongside your local comments.

Hi, I'm Emily!
What's Popular

30-Minute Meals!
Join to receive our email series which contains a round-up of some of our quick and easy family favorite recipes.