
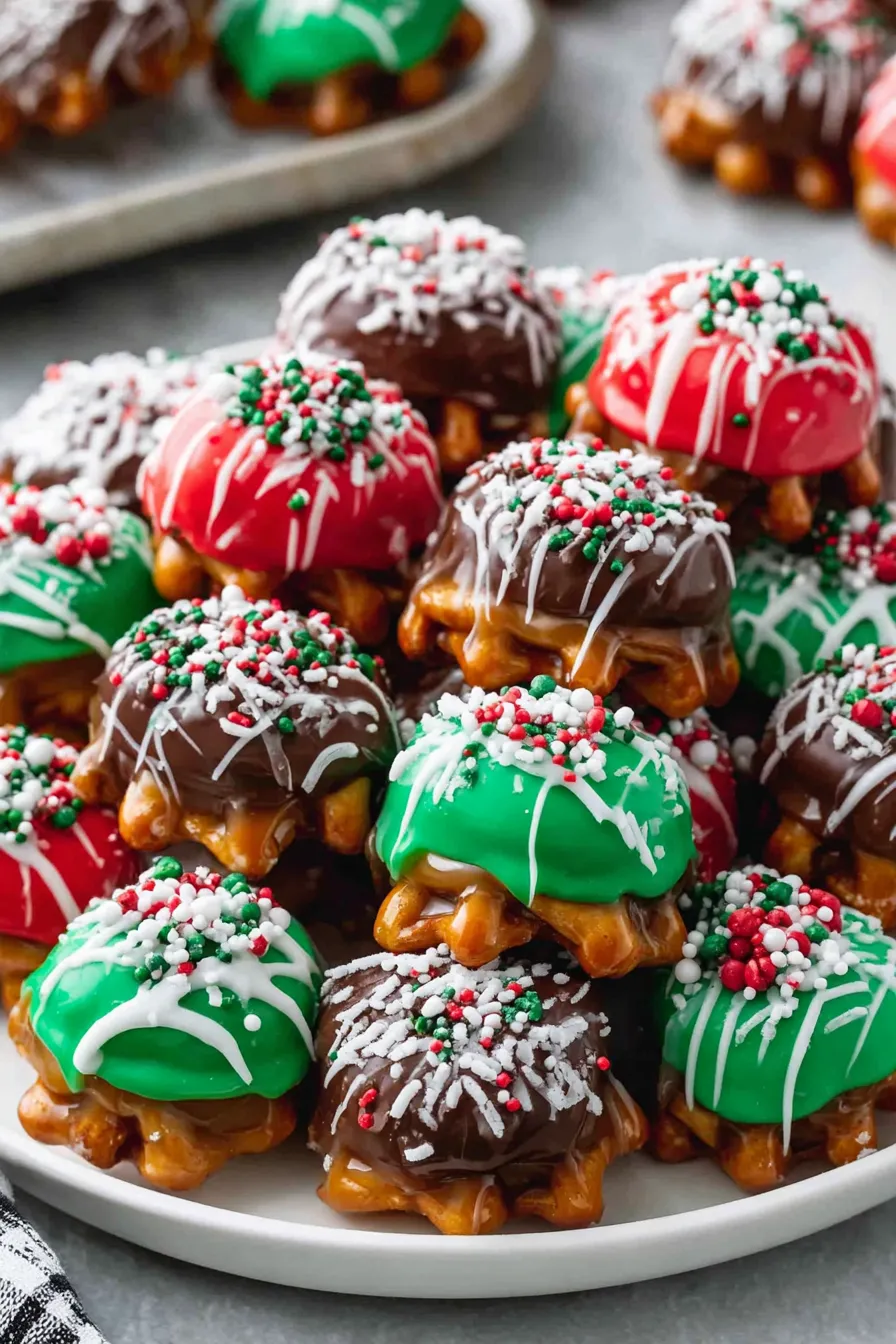
Christmas Caramel Pretzel Bites

Sweet, salty, and festive — bite-sized pretzel sandwiches filled with caramel and coated in red, green, and white candy melts. Perfect for holiday parties and edible gifts.
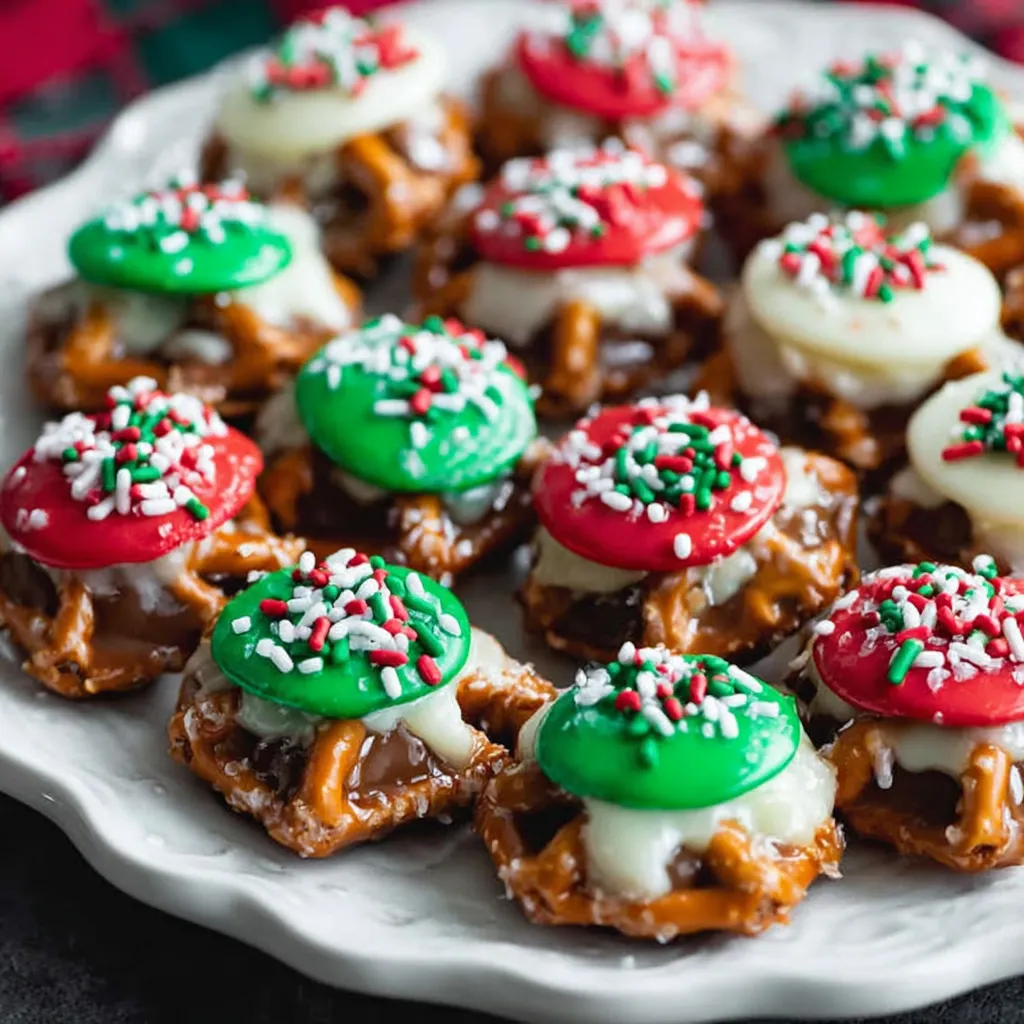
This holiday treat combines the irresistible crunch of mini pretzels with soft, chewy caramel and a glossy candy coating in classic Christmas colors. I first made these during a busy December when I needed an easy, no-bake festive sweet to bring to a cookie swap. They came together in under an hour, used simple pantry items, and disappeared before I finished arranging them on the platter. The contrast of the crunchy pretzel, warm caramel center, and smooth candy coating creates a textural trio that has made these a seasonal favorite in my family.
I remember watching my niece's eyes light up as she chose the ones decorated with the most sprinkles; making them became a small holiday ritual for us. What makes these bites special is how adaptable they are — you can change colors, toppings, or the candy base to suit any theme. They are sturdy enough to package for gifts, yet delicate enough to feel homemade. The balance of sweet and salty is immediate on the first bite, with the caramel providing a soft, central chew that pairs perfectly with the crisp pretzel shell and the snap of the candy coating.
Why You'll Love This Recipe
- Quick to make: ready in about 45 minutes from start to finish, with only 5 minutes of oven time and easy melting steps.
- Uses pantry staples: mini pretzels, wrapped caramels, and candy melts — no specialty equipment required.
- Make-ahead friendly: they set at room temperature and keep well in airtight containers for gift-giving or party platters.
- Crowd-pleasing texture: crunchy pretzel, soft caramel center, and a crisp candy shell for contrast.
- Customizable decoration: swap colors, sprinkles, or drizzle patterns to match any holiday or theme.
- Kid-friendly assembly: simple steps let kids help press, drizzle, and decorate safely.
In our home these quickly became a holiday staple; friends asked for the recipe after the first year. I learned to space the pretzels evenly on the sheet to avoid crowded caramel spread and to work quickly when sandwiching so the caramel is still tacky. Packaging them in clear cellophane bags tied with ribbon made them a hit as small hostess gifts.
Ingredients
- Mini pretzel twists: 48 pieces. Look for uniform, bite-sized twists for even sandwiching and a consistent bite. I favor a lightly salted brand with a crisp snap; avoid overly large or irregular shapes.
- Soft caramels: 12 wrapped caramels, unwrapped and halved. Choose a soft butter caramel for pliability; unwrapping and halving yields 24 thin rounds perfect for melting between pretzels.
- Red candy melts: 1 cup. Use high-quality candy melts for a smooth finish; baking supply brands melt evenly and hold color well.
- Green candy melts: 1 cup. Keep a small jar of vegetable shortening on hand to achieve a glossy, pourable consistency without thinning too much.
- White candy melts: 1 cup. White provides a bright contrast and a place to add sprinkles while wet; choose confectionery coating labeled for melting.
- Vegetable shortening: 1 to 2 tablespoons. Adds shine and thins the melts slightly for drizzling; add sparingly, one teaspoon at a time.
- Holiday sprinkles: Assorted, to decorate while the white coating is still tacky. Use nonpareils, stars, or festive shapes for visual appeal.
Instructions
Preheat and prepare baking sheet: Preheat the oven to 375°F (190°C). Line a rimmed baking sheet with parchment paper to prevent sticking and for easy cleanup. Arrange the parchment so the pretzels sit flat without overlapping; this ensures even heating of the caramels. Arrange pretzels and add caramel: Place 24 mini pretzel twists in a single layer on the prepared baking sheet, spaced about 1 inch apart. Take 12 soft caramels, unwrap them, and cut each in half. Lay one half on the center of each pretzel. Halving the caramels helps them melt more quickly and creates a thinner, more manageable sandwich filling. Bake caramel on pretzels: Slide the sheet into the preheated oven and bake for 5 minutes, watching carefully. The caramels should become soft and slightly glossy but not fully liquid. This is the visual cue the caramel is ready to bond with the top pretzel without spilling over the sides. Top with remaining pretzels: Remove the sheet from the oven and immediately press a matching pretzel twist on top of each softened caramel piece to create a sandwich. Press gently — just enough to spread the caramel to the edges but not so hard that it oozes out. Leave them to cool on the sheet until the caramel firms, about 15 to 20 minutes at room temperature. Melt candy coating: In a microwave-safe bowl, combine 1 cup of red candy melts with 1 teaspoon of vegetable shortening. Microwave at 30-second intervals, stirring after each, until smooth. If the melts are thick, add another teaspoon of shortening. Repeat separately for green and white melts, using a clean bowl for each color to prevent cross-contamination. Drizzle and decorate: Transfer melted candy to a piping bag or a small resealable bag with a tiny corner cut off. Drizzle the red coating over each pretzel bite and allow to set slightly. Repeat with the green coating. Finish with white melts drizzled over or used to create a contrasting stripe; while the white is still wet, sprinkle holiday decorations so they adhere before the coating hardens. Set and store: Allow the candy coatings to harden completely at room temperature, about 30 to 60 minutes depending on humidity. Store in an airtight container at room temperature for up to one week, or refrigerate to extend shelf life. Avoid stacking layers directly — separate with parchment.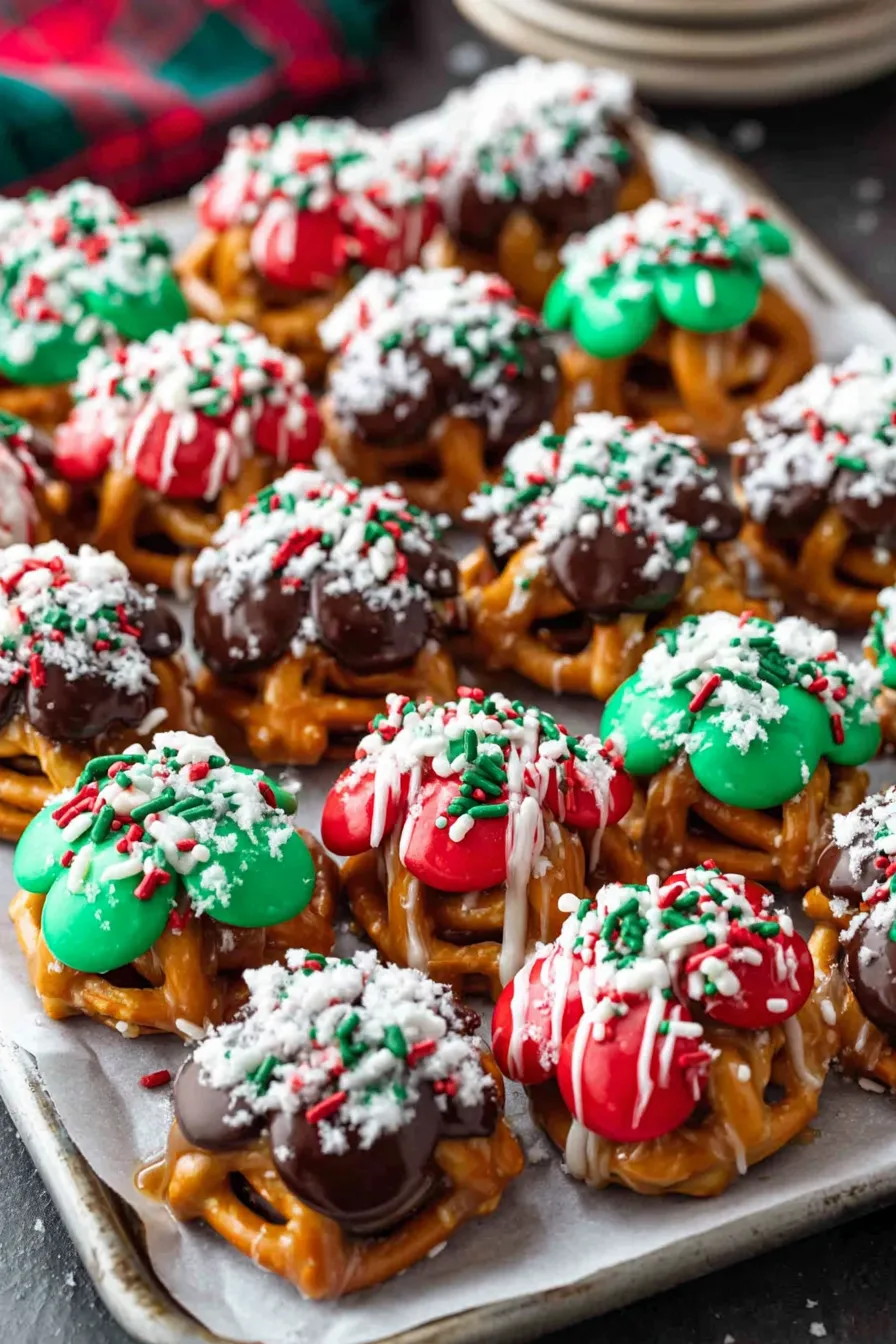
You Must Know
- Texture note: the best bites balance a crisp pretzel exterior with a soft caramel center and a firm candy shell.
- Storage: keep in an airtight container at room temperature for up to 1 week; refrigerate up to 2 weeks but allow to come to room temperature for the best texture.
- Freezing: freeze on a single layer for up to 3 months, then transfer to a sealed container with parchment between layers.
- Allergens: contains gluten from pretzels and dairy from caramels and some candy melts; check labels for soy or milk derivatives.
- Setting time: humidity can slow setting; a cool, dry room speeds the candy hardening.
What I love most is how versatile these are — one double-batch provides plates for a party and small gift bags for neighbors. Over the years I've adjusted the drizzle patterns and discovered that a small pinch of sea salt on top before the coating fully sets enhances the sweet-salty contrast brilliantly. Family members started requesting different color schemes for winter birthdays after the first holiday season.
Storage Tips
Store the bites in a single layer in an airtight container, separating layers with parchment or wax paper to prevent sticking. At room temperature they keep for about one week; refrigeration extends life to two weeks but may dull the glossy finish and harden the candy so bring them back to room temperature before serving. For longer storage, freeze on a tray until solid, then move to a freezer-safe container for up to three months. Thaw at room temperature in the container to avoid condensation on the candy surface.
Ingredient Substitutions
If you prefer a different sweet center, substitute mini chocolate squares or soft nougat pieces in place of caramels, but reduce oven time accordingly. For a dairy-free version, use vegan caramel chews and dairy-free candy melts labeled vegan; note texture may vary. To make them gluten-free, swap in certified gluten-free pretzel twists. If vegetable shortening isn't available, a small amount of neutral oil can help thin candy melts, though it won’t provide the same sheen.
Serving Suggestions
Present the bites on a festive platter lined with a doily or parchment and group by color for visual impact. They pair well with hot chocolate, mulled cider, or coffee and make charming additions to dessert tables. For gifting, place 6 to 8 pieces in clear cello bags, tie with ribbon, and attach a small tag. For a party, set them next to bowls of mixed nuts and cheese to balance sweet and savory options.
Cultural Background
The sweet-and-salty combination has roots in modern American holiday confectionery trends that prioritize contrasting textures and flavors. Candy-coated bites like these evolved from traditional chocolate-covered pretzels and toffee treats, with seasonal candy melts adding the visual flair associated with holiday confectionery. They’re part of a recent tradition where simple pantry elements are elevated into colorful party-ready sweets.
Seasonal Adaptations
Switch color palettes and toppings for other holidays: pastel melts and edible glitter for Easter, orange-and-black for Halloween, or red-white-blue for summer celebrations. Add a dash of cinnamon or pumpkin spice into melted white coating in autumn for a seasonal twist. You can also replace holiday sprinkles with crushed peppermint in winter for a peppermint-caramel version.
Meal Prep Tips
Prepare components in stages: halve and unwrap caramels and store in a covered bowl in the fridge until ready. Melt one color at a time to manage cleanup and make decorating an assembly-line task. Use disposable piping bags for quick swaps between colors. For large batches, set up stations: baking sheet with sandwiches, three melting bowls, and a sprinkling station to keep the process smooth and enjoyable.
These bite-sized sweets capture the spirit of holiday entertaining — easy to make, shareable, and endlessly adaptable. I hope you make a batch to share with someone special this season.
Pro Tips
Work in small batches when melting candy melts to avoid seizing; add 1 teaspoon of vegetable shortening at a time until you reach a drizzle-able consistency.
Press the top pretzel onto the softened caramel immediately after baking while the caramel is tacky to create a neat sandwich without overflow.
Use parchment-lined trays and let coated bites set fully at room temperature to avoid condensation that can dull the candy shine.
If humidity is high, set the finished bites in a cool, dry room or briefly in the refrigerator to speed setting, but return to room temperature before serving for best mouthfeel.
This nourishing christmas caramel pretzel bites recipe is sure to be a staple in your kitchen. Enjoy every moist, high protein slice — it is perfect for breakfast or as a wholesome snack any time.
FAQs about Recipes
How long do these keep?
Yes. Store them in an airtight container at room temperature for up to one week. Refrigerate to extend freshness to two weeks; allow to come to room temperature before serving for best texture.
Can I freeze the bites?
Freeze in a single layer until firm, then transfer to a freezer-safe container for up to 3 months. Thaw at room temperature.
Can I make these vegan or gluten-free?
Use vegan caramel chews and vegan candy melts, and choose certified gluten-free pretzels to make a vegan and gluten-free version. Texture may vary slightly.
Tags
Christmas Caramel Pretzel Bites
This Christmas Caramel Pretzel Bites recipe makes perfectly juicy, tender, and flavorful steak every time! Serve with potatoes and a side salad for an unforgettable dinner in under 30 minutes.
Ingredients
Base
Candy Coating
Toppings
Instructions
Preheat and Prepare
Preheat oven to 375°F (190°C). Line a rimmed baking sheet with parchment paper and arrange 24 pretzels in a single layer for initial caramel melting.
Position Caramels
Unwrap 12 soft caramels and cut each in half. Place one half on the center of each pretzel on the baking sheet, spacing about 1 inch apart to allow even heating.
Melt Caramels
Bake for 5 minutes or until caramels are softened and glossy but not fully liquid. Watch closely to prevent burning or excessive spread.
Create Sandwiches
Remove the sheet from the oven and immediately press a matching pretzel on top of each softened caramel piece. Press gently to spread caramel to the edges without oozing.
Cool Before Coating
Allow pretzel sandwiches to cool and the caramel to firm, about 15 to 20 minutes at room temperature, before coating in candy melts.
Melt Candy Melts
In separate microwave-safe bowls, melt red, green, and white candy melts with 1 teaspoon of vegetable shortening, microwaving in 30-second bursts and stirring until smooth.
Drizzle and Decorate
Drizzle each color over the bites using piping bags. Work from darkest to lightest, and while the white coating is still wet, add sprinkles so they adhere.
Set and Store
Let coatings harden at room temperature for 30 to 60 minutes. Store in an airtight container at room temperature for up to one week or refrigerate to extend shelf life.
Last Step: Please leave a rating and comment letting us know how you liked this recipe! This helps our business to thrive and continue providing free, high-quality recipes for you.
Nutrition
Did You Make This?
Leave a comment & rating below or tag
@cravele on social media!
Categories:
You might also like...

Fudgy Marshmallow Brownies
Ultra-fudgy brownies studded with chocolate chunks, crowned with gooey marshmallows and a quick cocoa icing for irresistible, crowd-pleasing decadence.

Buttery Pecan Pie Bars
Buttery shortbread crust topped with a gooey brown sugar pecan filling. Easy, crunchy, and truly irresistible with just 10 minutes of prep.

Silky No-Crack Pumpkin Cheesecake
Silky pumpkin cheesecake with a spiced graham crust, no cracks, effortless mixing, and decadent caramel and rum whipped cream for unforgettable holiday celebrations.
Did You Make This?
Leave a comment & rating below or tag @cravele on social media!
Rate This Recipe
Share This Recipe
Enjoyed this recipe? Share it with friends and family, and don't forget to leave a review!
Comments (1)
This recipe looks amazing! Can't wait to try it.
Comments are stored locally in your browser. Server comments are displayed alongside your local comments.

Hi, I'm Emily!
What's Popular

30-Minute Meals!
Join to receive our email series which contains a round-up of some of our quick and easy family favorite recipes.