
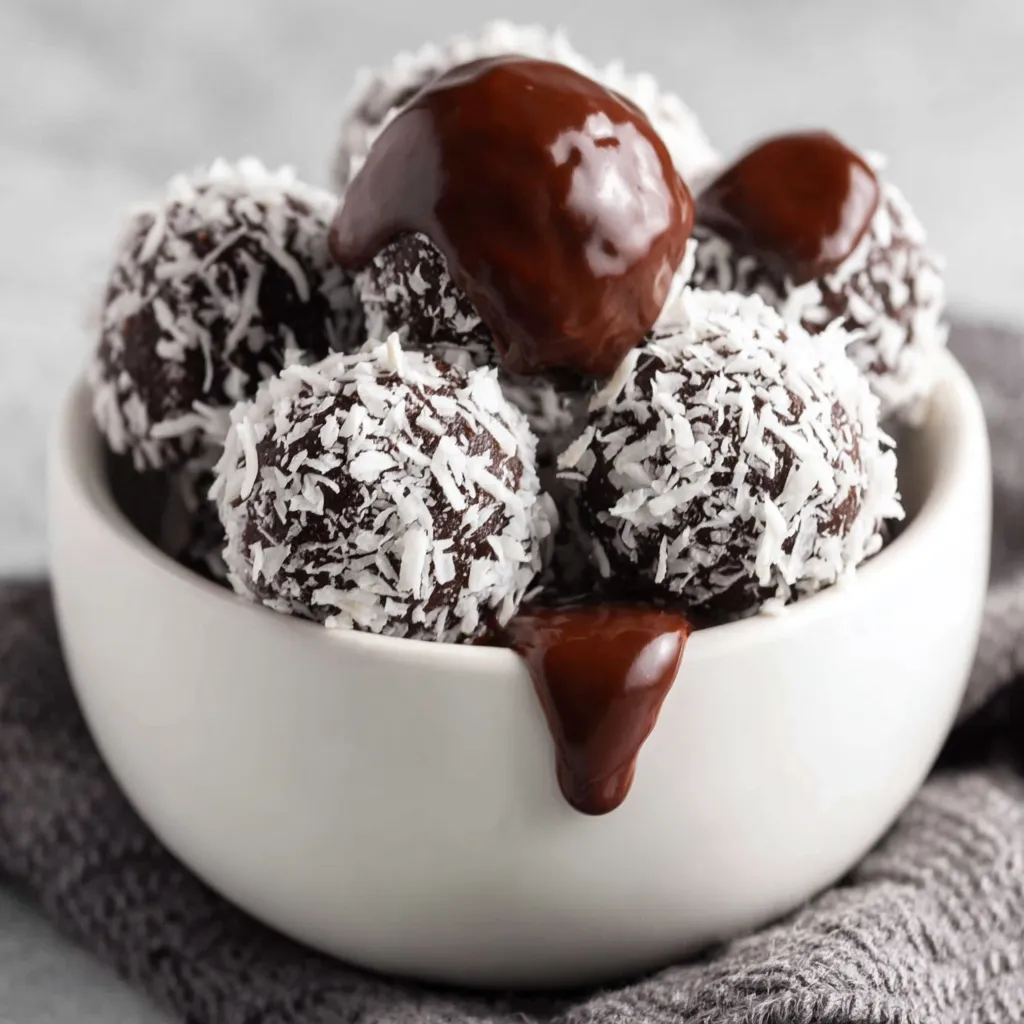
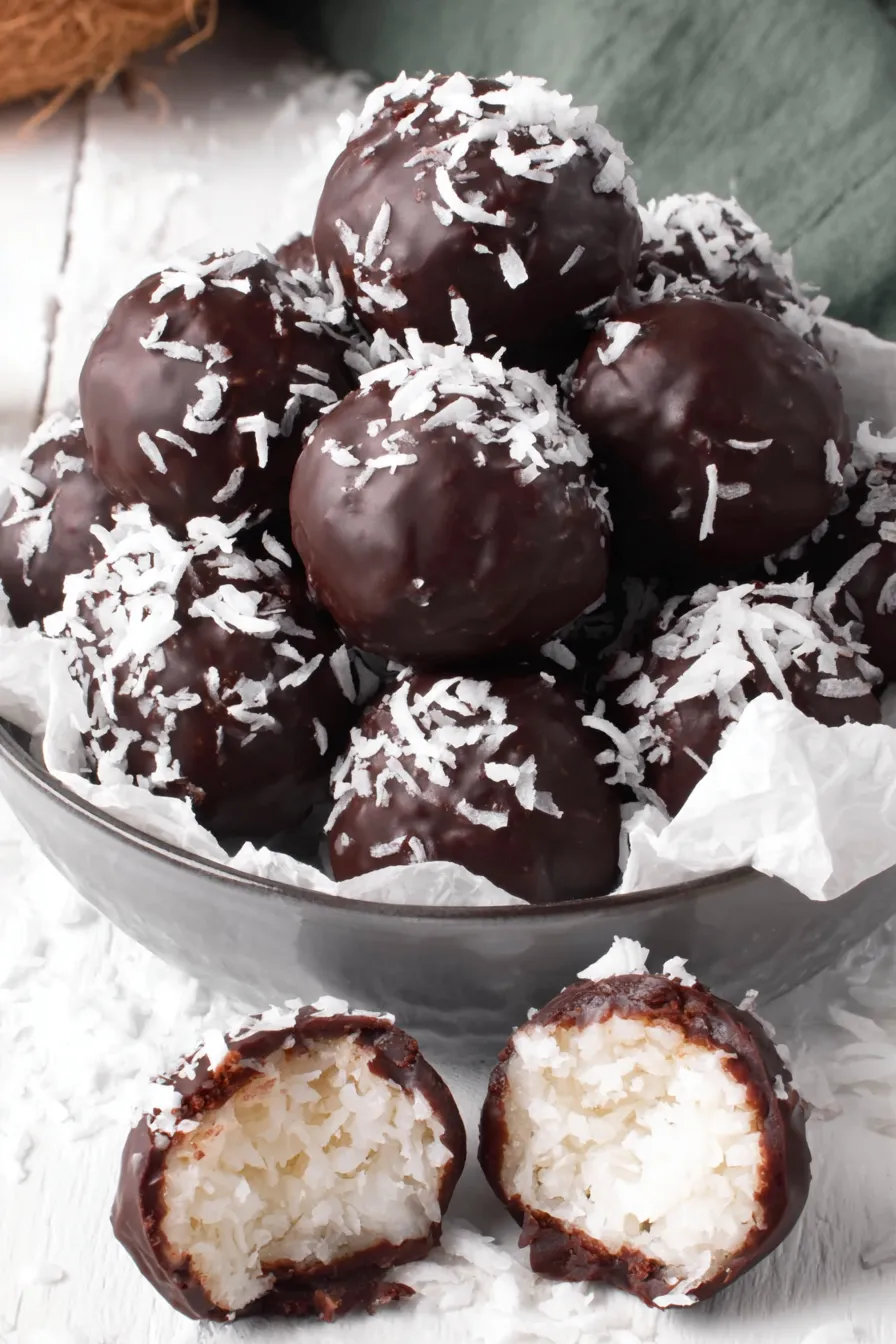
Chocolate Coconut Balls

Soft, chewy coconut centers enrobed in glossy dark chocolate — a quick, crowd-pleasing treat that’s perfect for parties, weekday snacks, or making with kids.
This recipe for Chocolate Coconut Balls is one I reach for whenever I want a small, impressive sweet that takes very little hands-on time. I first made these on a rainy afternoon with a jar of condensed milk left over from a baking project; the result was so rich and addictive that they became my go-to offering for potlucks and last-minute guests. The center is tender and slightly chewy from desiccated coconut and confectioners' sugar, while the dark chocolate shell gives a satisfying snap and deep cocoa flavor.
What makes these especially special is how reliably they turn out: no baking, little clean-up, and all pantry-friendly ingredients. I love that each bite balances sweet and coconutty textures — the condensed milk binds everything together, keeping the interior moist without making it sticky. Family members have dubbed them “the little chocolate domes,” and they always disappear fast at holiday gatherings or after-school snacks. You’ll notice that the centers are soft but hold their shape when chilled, and the chocolate coating seals in that coconut flavor beautifully.
Why You'll Love This Recipe
- Make-ahead friendly: centers can be shaped and chilled ahead, so dipping is fast when guests arrive.
- Simple pantry ingredients: uses desiccated coconut, powdered sugar, sweetened condensed milk, and chocolate chips — nothing exotic required.
- Quick to finish: once centers are chilled, melting and dipping take about 10–15 minutes — ready in roughly 30–40 minutes total.
- Kid-friendly and portable: ideal for lunchboxes, picnics, or party platters since they store well refrigerated.
- Customizable coating: use dark, semi-sweet, or milk chocolate; add sprinkles, chopped nuts, or toasted coconut for variation.
I often make a double batch when I know company is coming; people love the texture contrast and the glossy chocolate shell. The recipe reliably pleases both picky and adventurous eaters, and it’s become a requested addition on weekends and holidays.
Ingredients
- Desiccated coconut (1 3/4 cups): Use unsweetened desiccated coconut for the best texture and coconut flavor. Look for fine flakes rather than long shredded pieces; they compact better and produce a smooth center. Brands like Let's Do Organic or Baker's offer consistent texture.
- Powdered sugar (1 3/4 cups): Also labeled confectioners' sugar. Sift if you see any lumps — it helps the mixture blend smoothly and prevents grainy centers.
- Sweetened condensed milk (1/2 cup): This is your binder and sweetener. Use full-fat condensed milk (e.g., Eagle Brand) for a richer, creamier mouthfeel. If you need a slightly lighter option, a reduced-fat version will still work but the centers may be a touch less creamy.
- Dark or semi-sweet chocolate chips (2 cups): Choose a chocolate you like to eat on its own — 60–70% cacao dark chips give a pleasant bitterness that contrasts the sweet coconut, while semi-sweet is milder. Ghirardelli or Guittard chips melt smoothly.
- Shortening (2 tablespoons): Adding a small amount of shortening (Crisco) gives a shinier, more stable coating and slightly thins the melted chocolate to make dipping easier. You can substitute 1 teaspoon coconut oil if you prefer, but texture and sheen may vary.
Instructions
Combine the dry and wet ingredients: In a large mixing bowl, whisk the confectioners' sugar briefly to remove lumps, then add the desiccated coconut. Pour in the sweetened condensed milk and stir with a spatula until fully combined. The mixture should hold together when pressed; if it feels too dry, add up to 1 teaspoon more condensed milk. Work quickly so the sugar doesn’t dissolve completely into a paste — you want a slightly cohesive, moldable texture. Shape and chill: Using a teaspoon or small cookie scoop, portion the mixture and roll into 1-inch balls between your palms. Place each ball on a baking sheet lined with wax paper, leaving about 1/2 inch between pieces. Once all are shaped, transfer the tray to the refrigerator for at least 30 minutes — chilling firms the centers so the chocolate adheres and the balls keep their shape during dipping. Melt the coating: Place the chocolate chips and shortening in a microwave-safe glass bowl. Microwave at 50% power in 20–30 second bursts, stirring between intervals until smooth. Alternatively, melt in a heatproof bowl set over gently simmering water (double-boiler method), stirring until glossy. The goal is a pourable, lump-free coating about 88–90°F if you have a thermometer for optimal shine. Dip and finish: Spear a chilled coconut ball with a fork or dipping tool, submerge it into the melted chocolate, and lift, allowing excess to drip back into the bowl. Tap the fork gently on the bowl's rim to remove extra chocolate, then transfer the coated ball back to the wax paper. For a clean bottom, you can drag a fork tines across the underside to remove drips. If desired, sprinkle toasted coconut, flaky sea salt, or chopped nuts on top before the coating sets. Set and store: Allow the coating to set at room temperature for 10–15 minutes, or speed up the process by returning the tray to the refrigerator for another 10 minutes. Store finished pieces in an airtight container in the fridge for up to 2 weeks. For longer storage, freeze for up to 3 months; thaw in the refrigerator before serving.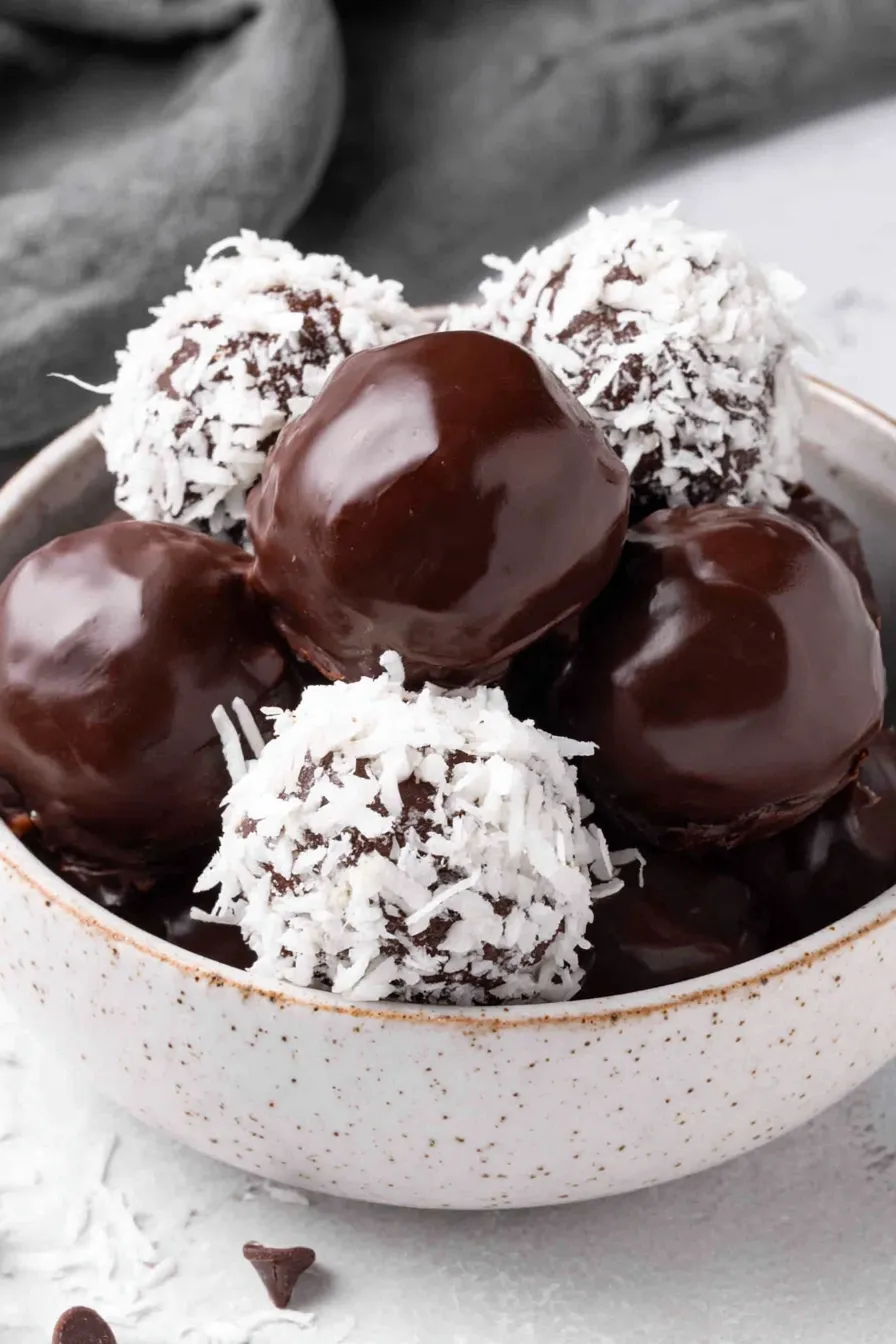
You Must Know
- These treats are best stored refrigerated and will keep for up to two weeks in an airtight container; they also freeze well for up to three months.
- Roughly 24 one-inch balls can be made from this quantity; calories per piece average about 110 kcal depending on chocolate choice.
- To prevent chocolate bloom (dull, white coating), avoid temperature shocks — let centers be cold but not frozen when dipping.
- Chocolate choice affects sweetness and texture: higher-cacao dark chocolate will be firmer and less sweet than semi-sweet or milk chocolate.
My favorite part is seeing the glossy sheen of freshly dipped pieces before they set — it always feels satisfying. I remember bringing a tin to holiday gatherings where my neighbor declared them the first to vanish; that moment convinced me that these small, simple confections punch well above their weight when it comes to crowd-pleasing.
Storage Tips
For short-term storage, arrange the pieces in a single layer in an airtight container with parchment between layers to prevent sticking, and refrigerate. For longer keeping, freeze on a tray until firm, then transfer to a freezer-safe container or bag; label with the date and use within three months. To thaw, move to the refrigerator for several hours to avoid condensation forming on the chocolate. When serving straight from the fridge, let sit at room temperature for 10–15 minutes for the center to soften slightly.
Ingredient Substitutions
If you want a dairy-free version, substitute the sweetened condensed milk with a vegan condensed milk alternative (coconut-based) and use dairy-free chocolate chips; texture may be slightly looser, so chill longer. Swap shortening with coconut oil for a subtle coconut aroma, but reduce quantity to 1 teaspoon if you prefer a firmer shell. For a less sweet center, reduce powdered sugar by 2 to 4 tablespoons, but expect a softer texture — you may need extra chilling time.
Serving Suggestions
Serve these on a small dessert platter with a mix of plain and finished-with-toasted-coconut options. They pair well with black coffee, espresso, or a lightly brewed tea to cut through the sweetness. For holiday platters, alternate plain and decorated pieces and add fresh berries or candied orange slices for color contrast. They also work beautifully in gift tins layered with wax paper.
Cultural Background
Confections combining coconut and chocolate are common worldwide; these particular no-bake domes are inspired by European and North American candy-making traditions that favor simple, pantry-based sweets. Coconut itself has been used in desserts for centuries, and combining it with sweetened condensed milk is a technique popularized by home cooks because condensed milk acts as both sweetener and stabilizer, creating creamy fillings without complex equipment.
Seasonal Adaptations
For winter holidays, add 1/2 teaspoon cinnamon or 1/4 teaspoon ground cardamom to the center mixture for warmth. In spring, press a small candied citrus peel strip on top of each coated piece. For summer gatherings, use milk chocolate and top with chopped toasted macadamia nuts or freeze the pieces slightly for a cool, firm bite that holds up outdoors.
Meal Prep Tips
To make these ahead, shape all centers and freeze them on a tray until firm; once frozen, transfer to a bag. When ready to coat, work with a few at a time to keep the centers cold and prevent melting. Dipping straight from frozen can cause the shell to set with slight condensation — chilling in the fridge for 10–15 minutes after removing from the freezer reduces that risk and improves finish.
These little chocolate-covered coconut bites are deceptively simple but reliably delightful. Whether you’re making a quick batch for a weeknight treat or preparing dozens for a celebration, they deliver texture, flavor, and nostalgia in every bite — and they’re a recipe that’s easy to make your own.
Pro Tips
Chill the centers thoroughly before dipping to maintain a clean shape and prevent the chocolate from becoming streaked.
Use a small cookie scoop for uniform 1-inch balls; consistent size helps coating set evenly.
If chocolate thickens while you work, rewarm briefly at 50% microwave power or over a double boiler — avoid overheating which can seize the chocolate.
This nourishing chocolate coconut balls recipe is sure to be a staple in your kitchen. Enjoy every moist, high protein slice — it is perfect for breakfast or as a wholesome snack any time.
FAQs about Recipes
Can I freeze the coconut centers before coating?
Yes — shape the centers and freeze them on a tray until solid; store frozen in a bag for up to 3 months. Thaw in the refrigerator before dipping.
What is the best method to melt the chocolate?
Use a microwave-safe bowl at 50% power in 20–30 second intervals, stirring between bursts until smooth. Alternatively use a double boiler over simmering water.
Tags
Chocolate Coconut Balls
This Chocolate Coconut Balls recipe makes perfectly juicy, tender, and flavorful steak every time! Serve with potatoes and a side salad for an unforgettable dinner in under 30 minutes.
Ingredients
Coconut Mixture
Coating
Instructions
Combine dry and wet ingredients
In a large bowl, whisk powdered sugar briefly, add desiccated coconut, then pour in sweetened condensed milk. Stir until the mixture holds together when pressed. If too dry, add up to 1 teaspoon more condensed milk.
Shape and chill
Scoop and roll the mixture into 1-inch balls using a small cookie scoop or teaspoon. Place on a wax-paper-lined baking sheet and refrigerate for at least 30 minutes to firm up.
Melt the chocolate
Place chocolate chips and shortening in a microwave-safe bowl and heat at 50% power in 20–30 second bursts, stirring between intervals until smooth and glossy. Alternatively, melt over a double boiler.
Dip the balls
Using a fork or dipping tool, submerge chilled balls into the melted chocolate, allow excess to drip off, then transfer back to the wax paper. Optionally top with toasted coconut or chopped nuts before the coating sets.
Set and store
Let the coating set at room temperature for 10–15 minutes or refrigerate for 10 minutes. Store in an airtight container in the fridge for up to two weeks or freeze for up to three months.
Last Step: Please leave a rating and comment letting us know how you liked this recipe! This helps our business to thrive and continue providing free, high-quality recipes for you.
Nutrition
Did You Make This?
Leave a comment & rating below or tag
@cravele on social media!
Categories:
You might also like...

Fudgy Marshmallow Brownies
Ultra-fudgy brownies studded with chocolate chunks, crowned with gooey marshmallows and a quick cocoa icing for irresistible, crowd-pleasing decadence.

Buttery Pecan Pie Bars
Buttery shortbread crust topped with a gooey brown sugar pecan filling. Easy, crunchy, and truly irresistible with just 10 minutes of prep.

Silky No-Crack Pumpkin Cheesecake
Silky pumpkin cheesecake with a spiced graham crust, no cracks, effortless mixing, and decadent caramel and rum whipped cream for unforgettable holiday celebrations.
Did You Make This?
Leave a comment & rating below or tag @cravele on social media!
Rate This Recipe
Share This Recipe
Enjoyed this recipe? Share it with friends and family, and don't forget to leave a review!
Comments (1)
This recipe looks amazing! Can't wait to try it.
Comments are stored locally in your browser. Server comments are displayed alongside your local comments.

Hi, I'm Emily!
What's Popular

30-Minute Meals!
Join to receive our email series which contains a round-up of some of our quick and easy family favorite recipes.